A sideboard operates on the same principle as a well-styled bookshelf or console table: it needs a defined structure that the eye can follow. Without structure, a sideboard becomes a flat surface that collects whatever ends up there—and it shows.
The difference between a sideboard that looks designed and one that looks accidental comes down to three things: back wall treatment, object height variation, and negative space. Get those three things right and the piece looks intentional regardless of what you put on it.
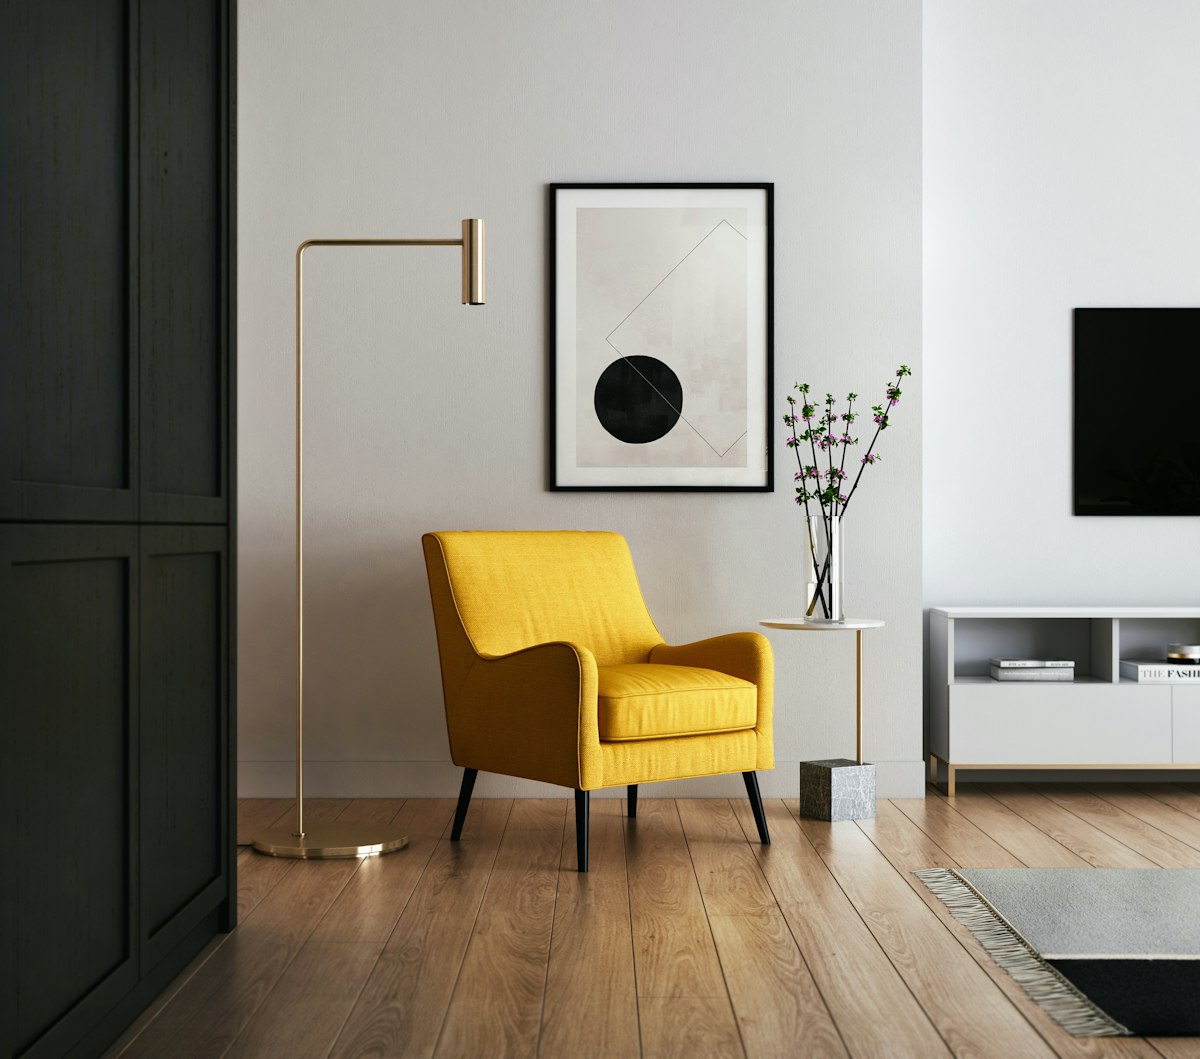
The Back Wall Is the Foundation
Before placing anything on the surface, decide what the back wall is doing. The wall behind a sideboard is the backdrop for everything on the surface. A blank wall reads as incomplete. A treated wall—with a mirror, art, or a grouping of frames—anchors the sideboard and connects it to the room vertically.
A single large mirror (at least as wide as the sideboard, ideally 70–80% of its width) is the most versatile back wall treatment. It reflects light, adds perceived depth, and works with almost any decor style. The bottom edge of the mirror should sit 6–10 inches (15–25 cm) above the sideboard surface—low enough to connect visually but high enough that objects on the sideboard don’t obscure it.
A large piece of art (single canvas or framed print) works best when it fills 50–70% of the wall width above the sideboard. Art narrower than 50% of the sideboard width reads as undersized and unanchored. If your art is narrow, group two or three pieces side by side to create a wider visual grouping.
A gallery grouping of 3–5 smaller frames in aligned rows creates structure without requiring a single large piece. Hang the bottom edge of the grouping 8–12 inches (20–30 cm) above the sideboard surface to allow for objects in front.
Height Variation: The Three-Level Rule
Objects at uniform height create a flat, shelf-like visual that doesn’t engage the eye. Height variation creates movement and directs attention.
Aim for three distinct height levels on the sideboard surface:
Tall objects (24–36 in / 61–91 cm): These anchor the composition and connect the surface to the back wall treatment. Good tall objects: tall vases, sculptural lamps, tall potted plants, artwork on stands. Use 1–2 tall objects maximum; more creates visual chaos.
Mid-height objects (10–18 in / 25–46 cm): These form the visual middle ground. Good mid-height objects: shorter vases or jars, candle holders, medium sculptures, stacked books (2–4 books), small table lamps. This is the most populated level.
Low objects (2–6 in / 5–15 cm): These add texture and variety at the surface level. Good low objects: small dishes, decorative trays, a single object inside the tray, candles, a small plant, a stone or ceramic piece. The tray is particularly useful because it groups small objects visually without requiring alignment precision.
Asymmetry is intentional. Don’t mirror the arrangement on left and right sides. Symmetrical arrangements read as formal; asymmetrical arrangements read as curated. Place a tall lamp on the left, a medium vase and stacked books in the center-right, a small tray of objects at the front-right. The viewer’s eye travels the composition rather than seeing it as two identical halves.
Negative Space
The most common styling mistake is filling the entire surface. Objects placed edge to edge, covering all available space, read as dense and cluttered. Empty space—negative space—is not failure to fill; it is a deliberate design element that makes the objects you do display read as chosen rather than accumulated.
Leave at least 30–40% of the surface empty. This sounds like a lot. In practice, it’s approximately what separates a styled sideboard from a cluttered one. Most people underestimate how much their eye is reading the empty areas as part of the composition.
Group objects into clusters with clear negative space between clusters, rather than distributing individual objects evenly across the surface. Three clusters of objects with visible gaps between them reads as more considered than seven objects evenly spaced.
The front 6–8 inches (15–20 cm) of the surface should have the lowest-height objects (the tray, low candles, a small dish). This creates visual depth—tall at the back, medium in the middle, low at the front—so the eye moves from front to back naturally.
The Tray: Portable Structure
A tray is the single most useful organizing tool for sideboard styling. It creates an instant boundary that groups objects inside it, separates the grouped items from objects outside it, and can be lifted and moved as a unit when you need to use the sideboard surface for serving.
The tray should be 20–40% of the sideboard’s total surface width and placed off-center (left or right third of the surface). Inside the tray: 2–4 small objects, maximum. A candle, a small vase or bud vase, a stone or ceramic figure. The tray’s edge creates a frame; the objects inside should not crowd it.
A wooden tray reads as warm and natural. A lacquered or metal tray reads as more formal. The tray material should complement the sideboard finish without matching it exactly—the visual interest comes from contrast, not uniformity.
Objects That Work (and Objects That Don’t)
Work well:
- A single large vase with stems (dried or fresh)
- Stacked books (3–4, with the largest at the bottom)
- A sculptural object of any material—ceramic, glass, stone, metal
- A tray grouping with 2–3 small items
- A candle or candleholder grouping
- A small potted plant or propagation vase
- A table lamp with a simple base
Work poorly:
- Framed family photos (they work better in galleries or on individual surfaces, not on sideboards—they add visual noise and make the piece harder to restyle)
- Identical objects in a row (two matching vases flanking a central object reads as hotel lobby)
- Electronic devices and cables (charging pads, speakers, cables immediately turn a styled sideboard into a utility surface)
- Decorative objects that are too small for the space (a 4-inch object on a 60-inch sideboard is invisible)
Styling for Specific Rooms
Dining room sideboard: The function is partially practical—the sideboard holds serving dishes, linens, and entertaining supplies. Style the surface for daily living (3–4 objects, negative space) and clear it completely for dinner parties when the surface becomes a serving station. The wall treatment above matters more here than in any other room because it anchors the dining end of the room.
Living room credenza: Functions as media storage, bar cart, or general storage. The cables and entertainment equipment that accompany a living room credenza are the primary enemy of good styling. Run all cables through the back of the unit or down the wall behind it. Nothing undermines a styled surface faster than a visible power strip.
Entryway console (low-profile sideboard): The most functional surface in the house. Style it for daily use: a tray that collects keys and mail, a lamp for entry lighting, one tall object (mirror overhead, not on the surface). Resist the impulse to add decorative objects that compete with the functional items—the entry needs to work first, look good second.
Quick Checklist
Before stepping back and assessing your sideboard:
- Back wall has a mirror, art, or grouped frames
- Back wall treatment is wide enough to anchor the sideboard (at least 50% of sideboard width)
- Three distinct height levels represented on the surface
- Arrangement is asymmetrical, not mirrored
- 30–40% of surface is visible negative space
- At least one tray or defined grouping
- No cables, devices, or utility items visible
- Objects are scaled to the sideboard—nothing under 6 inches (15 cm) tall standing alone without support
Review the checklist, adjust what’s missing, and step back 10 feet. The test is how it reads from across the room—that’s the only distance that matters.